Tuesday, September 25, 2012

Unanticipated Bathroom Update - Quick Custom Art Project

Last year, I showed you the pictures of our bathroom redo here.  Nothing much changed in the ensuing months...until Superman came home on leave in June.  Remember these two little vases on the shelf?
RIP two little Ikea vases.  The previous "picture" was too little anyway.
  It was a mushy greeting card Superman had given me early in our marriage...
I loved it so much, I framed it and have it up somewhere in our house all the time
They were pretty, weren't they?  Well, in one move, Superman bumped the shelf with enough force to knock them both off the shelf and send them crashing to the floor.  Bye-bye, Ikea vases.  After Superman went back to work, I rearranged to make it look like this. 

There have been fires in the area for more than a week...look how the
quality of the light is altered by the filter of smoke.  Do you like my blank
wall?  I even left the nail in place to nag at me to come up with art for the space.
I left a big blank space under the shelf and waited for inspiration. Well, here we are in September and inspiration took its sweet time!!  Fortunately, Costco supplied the missing piece and the project came together in a day.


These frames are really nice...didn't think to take a picture before the project.
Inspiration comes in the strangest forms, doesn't it?
Saw these frames at Costco...11 x 17 with matte...two frames for less than $20, plus 100 free prints from Costco.  These frames, combined with thoughts that had bouncing around in my head, resulted in the perfect art piece for our bathroom.  All it took was a piece of fabric and a vinyl cutout and 20 minutes later, we had "art".


The card is on the shelf now and my new art is on the wall...this new arrangement
is so much better and I still have my framed greeting card...plus a gift from my
daughter...the little sheep (including the black sheep) were a present.  I love them.
Look at this.  All I did was tape a piece of fabric to the back of the matte and apply a vinyl cut-out to the front of the fabric.  (I didn't even use iron-on vinyl.  This is just standard vinyl...Oracle 631 from Expressions Vinyl.)  I tucked the end of the branch under the matte to make it look like the branch was coming out from behind the matte.  After that, I put it all back together and put it up on the nail that was still in the wall. 

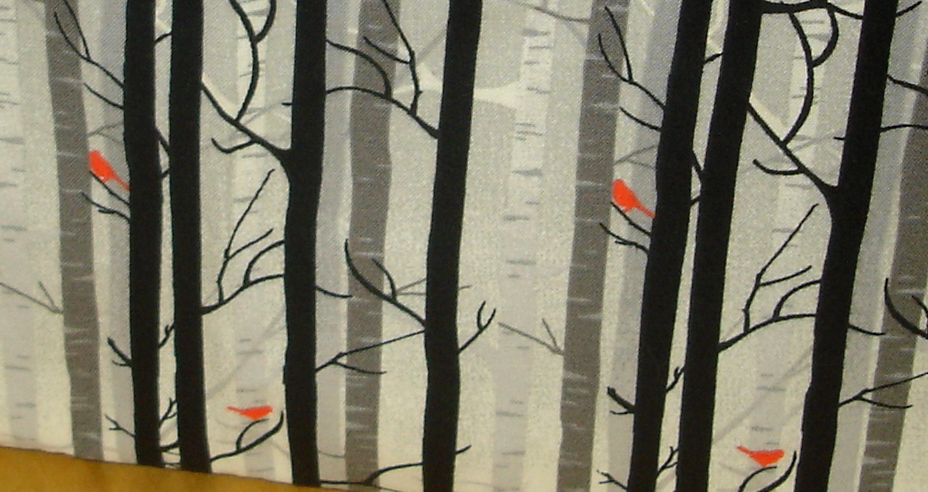
The original nail was too low, so I moved it up an inch.  Plus, the picture
was missing a little something.  It needed just one more thing.  Do you see it?
I love how it turned out.  Unfortunately, the nail wasn't in the right place, so I have a new nail hole (sorry, Superman!).  Plus, I think picture was missing a little something...it wasn't quite perfect.

There!   See?  I added a tiny heart above the birds.  The perfect
finishing touch!  Now, my project is just perfect.
Ah, now it is perfect!  I love the way this project turned out.  The nubby fabric and the smooth, matte vinyl look elegant framed with a picture matte.  I have one more frame...I need to find another place that is crying out for an art project!

Monday, September 24, 2012

Easy "Milk Bottle" Vase

This post is actually for my friend Karen (and her daughter, Jessica) who sent me a note saying she needed some "repurposing" ideas for a class they'll be hosting this spring.  So, Karen and Miss Jessica, I hope you like this one!

My sunshiny kitchen window...
A couple of years ago, I purchased these teeny, tiny milk bottle vases from the Dollar Spot at Target.  I just loved their simplicity.  I put them on my kitchen window sill and used them to decorate for the seasons/holidays.  Occasionally, I'd wish they were bigger, but they weren't, so that was that.


Cute, but limited by their teeny size.
This past winter, my daughter went through a phase where she was drinking Starbuck frappuccinos with far too much regularity (yes, I know I'm a bad parent...I've accepted it and moved on!).  One day, as I was collecting the bottle(s) she left out (grr!), I realized they looked like little milk bottles and an idea was born.

Doesn't this look like a milk bottle?

First things first, I removed the labels from the Starbucks bottle.  They peel off pretty easily, but you'll definitely need Goo Gone to get the adhesive off the glass.  After that, I put them through the dishwasher to get them sparkly clean.


After a few coats of spray paint.
Then I filled a large can (a #10 can worked well) with sand (for weight/counter balance...clean kitty litter would work well, too) and stuck some dowels into it.  (Picture a bizarre barren bush.)    Put the bottles on the dowels upside down and spray paint the bottles.  It took a few thin coats to get good coverage. 

Before and After
When I was done, I had little white milk bottles.  After that, a few minutes with the Silhouette machine and I'd created bigger versions of my tiny milk bottles.

After adding Silhouette vinyl.  (Sorry for the photo quality...I took the
picture late one night.  Doesn't everyone finish crafty stuff late at night?)
There you have it, a quick and easy and virtually free repurposing idea (assuming you have a Frappuccino junkie in your house).   Karen, do you like this one?  Look again, doesn't this get your creative juices flowing?
Virtually free...
P.S.  Even after all these years, I still miss being your neighbor!!

Thursday, September 20, 2012

Sometimes I'm Still Surprised...

We've lived in Eastern Washington for 7 years now.  Most of the time, I think I've settled into the lifestyle here and go with the flow.   Seriously.  I don't even pause when I see a minivan with camo side panels (do families go hide in a duck blind with their minivans?).  Testicles hanging off of trucks don't faze me.  Baby clothes in blue and pink camoflauge patterns are de riguer.  Going to the local mall gives you a cross section of kids ranging from gang bangers to cowboys and everything in between.  Heck, we're even members of the local indoor shooting range.  (Oh, and in case you were wondering, yes, I am a terrible shot.)  Needless to say, I feel like we have settled into a rhythm here in our adopted home.   

Every once in a while, however, I am reduced to being a gaping child at some new-to-me sight.  Seriously.  I get all wide-eyed and pull out the camera, as if I need to be able to prove that I'm not just telling a tall tale.  So, look at what I saw at our local gas station one morning:


Here, have a closer look:


Yep, that is a cow in the bed of a pick-up truck.  (Oh, did I mention that here pick-up trucks are for work, not show, and they're referred to as rigs?)  So, some rancher/farmer had a cow in the back of his rig at the gas station.  I've never seen that before.


Of course, after I saw that, I wondered if the cow was off to the slaughterhouse because that is the other part of living here.  Cows aren't just scenery.  They're food.  I guess if my name is on the list for 1/8 of a cow, I have to own that.  Those beautiful cows grazing on grass in the pasture are destined for the dinner table...that is why they are being raised.  Meat doesn't come on a foam platter wrapped in cellophane.  Meat comes from animals.

Still, I sure hope I'm not getting part of that cow.  We bonded over the gas pumps.

Wednesday, September 19, 2012

Life in the Nagle5 Household

Superman is suffering from "short-timers" in a bad way.  As he counts down the days and continues with his job search (trying to land a job from 12000 miles away), he is often frustrated and impatient.  (Let's be real...he's not finding the Middle East to be a garden spot in the best of circumstances and these days, we're not seeing the best of circumstances!)  My job right now is to keep him upbeat and positive and distract him from the days oh-so-slowly turning on the calendar.  To that end, I try to share the humor and chaos of life at home.  Everything from the cats bringing live birds into the house (two this month (!), both of which we saved from an unsavory end) to tales of life in high school to my failed attempts at mastering a handstand (grr!) have become the language of life in the Nagle5 household. 


Who knew earbuds were so vital to daily life?
It seems the artists who draw our favorite comic strips have doubled down and joined the effort to keep Superman smiling.  So many have struck me, that I started cutting them out and adding commentary for Superman.  We get the local paper (comics are a great way to introduce your child to reading the newspaper!) and  I'm linking to the comics directly and sharing these with you here because Superman struggles to get internet that allows surfing websites and he'll get this as an email.  Here is a sampling of what I've cut out:  Our favorites these days are Baby Blues (no babies here anymore, but these guys obviously live what they draw...three kids are exponentially more than two, I tell you!), Zits (I haven't found the hidden camera that keeps capturing Valiant, but I know it is here), and Off the Mark (definitely our weird sense of humor.)

Life with Valiant:
Seriously...where is the hidden camera in my house?

Life with Buttercup:
After raising two boys, I feel qualified to say that girls are
different...no better, no worse, but definitely different!

(And don't you think Charming is relieved to have moved out of the house so I don't compare his life to life in the comic strips?)

Thursday, September 13, 2012

Animal Humor

I've shown you dog beds and cats bed over the past few years, but I haven't often shown you how they often end up being used...

Cajun has taken over the dog bed that Lucy normally sleeps on.   Watch the "conversation" they had at that point.

Cajun is sleeping peacefully on Lucy's bed.

She notices someone approaching..."Oh, great, here comes
that whiner, Lucy, again."
"Oh, hey, Cajun.  Can I have a turn on my bed now?"  "No"

"Oh, okay, Cajun, never mind.  I'll just sleep under Mom & Dad's bed."
 Yes, people, that is how things go in our house.  The cats and the dogs share so well, don't they?


Wednesday, September 12, 2012

My sister is fabulous!!

Look at what my sister sent me...

How can I slack off if I am wearing this???  (Dirty, sweaty, post-workout!)
A perfect reminder of why I do Crossfit.  Did I tell you that she joined her local Crossfit gym and loves it?  I am so happy for her.  After all, misery loves company!

Thanks so much, Love Aphid, you're the best!!

Tuesday, September 11, 2012

Remember...

(Photo credit: http://skeptikai.com/2011/09/page/2/)
“Now, we have inscribed a new memory alongside those others. It’s a memory of tragedy and shock, of loss and mourning. But not only of loss and mourning. It’s also a memory of bravery and self-sacrifice, and the love that lays down its life for a friend–even a friend whose name it never knew. “
- President George W. Bush, December 11, 2001

Monday, September 10, 2012

Quick Drawer Customization

My desk drawers are a weird size.  I've struggled to keep them organized, but I confess I've been only marginally successful.  Last week, I'd finally had enough and decided to tackle a reorganization project I've been thinking of for a while.
 
Doesn't everyone have a box knife, an exacto knife, and a chalk pencil in
their desk drawers??
 First, I emptied the drawers completely.  (Of course, it wasn't until the drawers were mostly empty that I remembered I needed a picture...sigh.)  As you can see, I had these organizing trays in the drawers, but they really didn't fit well and left unused and inaccessible space behind the tray and well as open space to the side of the tray.


This tray doesn't fit well...the siders are too short and the tray
doesn't fit well within drawer, leaving hard to access space.
Once I had empty drawers, I got to work.  I'd saved some wooden slates from an Ikea something that I just knew would come in handy and would make this project free!   (I think it was a couch of Charming's, but I really can't remember--Superman would remember exactly where these came from...that is how he rolls!)  I measured in the inside dimension of the drawers (individually, just in case they weren't exactly the same - they weren't!)  I headed to the garage and used the chop saw to cut a few of the slates to the inside length of the drawers. 
Played around with the dividers and some of the intended contents of
the drawer to see what configuration would be the best...
Then I started playing with various configurations until I settled on an arrangement that would work for me.  That was actually the most difficult part.  One drawer ended up with more sections than the other.
They're difficult to see in this photo, but the pieces are held together by staples.
Once I'd figured out the configuration I wanted, I used the brad nailer/stapler to put all the pieces together.

This drawer has fewer sections...it took only two pieces to make my
dividers...customized to my specifications!
Half an hour later, I had customized drawer dividers.  This could be done with heavy weight cardboard, too.  Look around...you might have something laying around that just might work.

This drawer took a little more time, but it was so worth it.
Best of all?  The dividers are completely removable in case my needs/wants change.   Did I mention I have two more drawers filled with sewing stuff and another handful of slats?  Not sure how I'll arrange those, but I'm sure I'll come up with something!

Tuesday, September 4, 2012

I have to wonder...

if the designers at Inov-8, used this little tree frog...

This little tree frog has beautiful coloring...definitely the muse for shoe
designers at Inov-8. 
 ...as their inspiration for my son's new shoes.

The shoes have the same "beautiful" coloring...on size 14 (!) shoes.
Let's review:

Colorful frog ...

The Frog


...leads to colorful shoes.


The Shoes--oh so impressive in person.
I'm convinced that is how it happened.  Are you with me?

Monday, September 3, 2012

Ponderings...

Read this quote recently...it gave me pause.  Now it is bouncing around in my head. 

Walt Whitman, 1887
"Reexamine all that you have been told in school, or in church, or in any book. Dismiss whatever insults your soul."
- Walt Whitman -

"insults your soul" - a powerful way to say "feels so wrong".

Hmmm...I guess questioning authority is a time-honored American tradition.

Wednesday, August 8, 2012

Fabric Bins

I've been needing some more storage in our bathroom and thought fabric bins would be the ideal solution.  Unfortunately, I haven't been able to find bins I like.  While I was at Hancock Fabrics last week, I saw this fabulous fabric and thought it would be perfect.  (It wasn't, but that is a later part of the story.)
I love this fabric...it is so beautiful.
Isn't this fabric beautiful?  I knew it would make beautiful storage bins.

This was the second bin I made...it came together so quickly and easily.
I saw this tutorial for making fabric bins from Make It and Love It and I decided it was actually doable.  Honestly, it turned out to be a little more difficult than "beginner" level, but not so difficult that I was discouraged by it.  Once I'd made the first box (following the super terrific instructions), the second box was a breeze.

This is the larger bin...it is the size the tutorial makes.
It only took two evenings to get the boxes done.  I am really pleased with how they turned out and, once I'd finished the first box, I understood exactly what I needed to do to change the dimensions to suit my space.  Unfortunately, they just didn't look right in the space...darn it.

A different view of the first bin...I didn't put in a label pocket.
That's okay, though, I've already thought of an alternative use for both bins.  Even better, I found another fabric (a completely different style) that I'm getting ready to use for two more fabric bins. 

I just love, love, love this fabric!
So, what else can I do with this fabric?  I love it that much.  I'm racking my brains trying to come up with something I can do with it.  Do you have any ideas?

Tuesday, August 7, 2012

Doubling DVD Storage

Last week, I finally got around to doing a quick project that doubled our DVD storage capacity.   It is super easy and makes a huge difference.
This is our family room.
This is what our shelves looked like in January.   They looked good.   The truth is, however, the kids don't watch their DVDs very much anymore and I really didn't want to devote as much shelf space to them.  Still, I didn't want to put them under a bed or in storage bins.  I remembered seeing this this simple solution on Ikea Hacker, but I honestly couldn't direct you to the actual post...it has just been bouncing around in my head, waiting for the right time!

Adding a little shelf on top of the shelf allows me to go two deep on the shelf.
All you do is measure the width of your shelf and cut a board slightly less (to allow you to slide it into the shelving--I wanted a tight fit)...then you attach two "legs" roughly 3" (tall enough to let you read the titles of the DVDs in the back row).   My whole project was done with scrap 1 x 3 wood.  I Also, remember to take into account the height of your shelf...you might want to adjust them to give yourself more wiggle room.  After that, you just attach your legs to your board, and, ta da, you have doubled your DVD storage space.


By raising them up, you will still be able to read the titles, even with
another row of DVDs in front of them.
Once you've filled up the back row, all you need to do is fill up the front row.  Easy peasy!

Doubles the DVD storage space.
I know it isn't exciting, but it does help me manage DVDs I don't want to get rid of.

This is what it looks like with the double row.
Honestly, I can hardly wait to make a few more little shelves and do the same thing with our VHS movies.


Monday, August 6, 2012

What a Difference an Hour Makes...

Before:

Barely awake, but oh so excited.
After:

Much more awake and a mouth full of metal...
Yes, I'm happy to report that the third and final of our three children has her braces.  That means we're in the home stretch of Nagle5 orthodontics.  Woot!

Tuesday, July 31, 2012

Would you like to see our garden?

One of the things I've learned from living in a place where we truly experience four true seasons is that by the end of winter, I'm desperate for color.  After the gray days of winter, I long for bright colors.  As soon as we have our last frost, I'm planting annuals and prepping for my perennials to come up.  Then, we wait...

By July, we have those bright colors we've been waiting for...

My day lily fence...
We have daylilies acting as a little fence between our yard and the neighbor's yard.

Self-seeded petunias...
We have a profusion of petunias...interestingly I planted only a few...these babies self-seeded from last year.
Aren't these beautiful?
We have gorgeous Asiatic lilies.


We have seven of these...
Look at our hanging planters...aren't they pretty?

Butterfly approved...the ultimate garden seal.
One of our two apple trees.  We didn't know they were apple trees until our third year here.  Improved irrigation did the trick.


And the view off our deck is still fabulous.  We keep hearing that they're going to build something horrible like retail there, but for now, we're oh so grateful that they haven't.

The view off our deck...geraniums are a nice pop of color, aren't they?
We get a lot of birds at the bird feeders, too.  The cats love that!
We have lots more going on, but these pictures give you a good idea of how busy our yard is keeping us.  Definitely some serious productivity going on here!