Showing posts with label recipe. Show all posts

Wednesday, January 29, 2014

Almond Flour Pancakes That Will NOT Leave You Wishing for REAL Pancakes


If you've given up wheat flour for any reason, whether you have celiac disease, are just gluten-intolerant or -sensitive, or have adopted a Paleo or Primal diet, you know that horrible moment when you bite into a flour-free version of an old favorite and it is either a) gross or b) only okay.  Either way, all that tends to happen is that you now miss the original more than you did before you tried the substitute.  Well, I won't say this recipe is perfect, but my most-of-us-try-to-stick-to-a-Paleo-diet family really, really enjoys it, even the non-Paleo members.  If you're looking for a good pancake recipe, this one is worth a try.  Best of all, it is a simple recipe.  No weird substitutions, no hoops to jump through to get it to turn out.   It works pretty much like any other pancake recipe you've tried.  Honestly, you just get to have good pancakes that won't make your stomach hurt, your skin break out, or whatever nasty side effect you get from wheat.  Even better?  Almond flour and eggs turn this into a high protein meal...if you forego the sweetener, which we often do, you're really having good for you pancakes.  Who knew? 
Almond Flour Pancakes
(adapted from Elana’s Pantry)
 Ingredients:
Whole Batch
3 cups Honeyville blanched almond flour
½ cup water
8 eggs
½ cup ghee or coconut oil, melted**
2 tablespoons real maple syrup or agave nectar*(I often omit this)
2 tablespoons vanilla extract
1 teaspoon baking soda
Pinch of salt
Ghee or butter for frying
 
Half Batch
1 ½ cups Honeyville blanched almond flour
1/3 cup water
4 eggs
1/3 cup ghee or coconut oil, melted**
1 tablespoon real maple syrup or agave nectar*(I often omit this)
1 tablespoon vanilla extract
½ teaspoon baking soda
Pinch of salt
Ghee or butter for frying


Instructions:

  1. With mixer or blender or whisk, combine ingredients until smooth and creamy.
  2. Using ghee or butter, grease griddle.  (I use an electric griddle set to 350oF.)   
  3. When griddle is hot, pour pancake batter onto griddle.
  4. Pancakes will bubble.  When the bubbles stay open, flip pancakes and cook other side.  Serve warm.

Hints and Tips:
The recipe as written makes a more liquid batter and, thus, a flatter pancake.  Sometimes I like to make a more cake-like pancake, especially when I’m adding blueberries to the batter.  Just play around with the liquid to get your desired consistency.

A half batch is ideal for my still-at-home family of four.  When I’m making them to be eaten at home, I omit the maple syrup because my family will pour syrup on top no matter what.  When I’m making them for quick weekday breakfast on the go, I include the syrup.  They reheat really well, so they’re the ideal commuter breakfast (not that anyone I know eats while they’re driving!)

**The original recipe called for heavy cream, which I never have on hand.  I played around with liquid to fat ratios to get the desired texture.  When you use butter instead of ghee or coconut oil, you might run into a problem with your batter being too watery.  If that happens, just decrease your water or increase your almond flour until you get the consistency you like.

NOTE:  Elana’s Pantry recommends Honeyville Blanched Almond Flour for all of her almond flour recipes.  I haven’t tried a different almond flour with this recipe, so I don’t know how that might work.  If you try a different brand, let me know.


Thursday, May 31, 2012

Pressure Cooker Artichokes

One night last week, Valiant was working and Buttercup and I took the opportunity to split an artichoke.  I am so grateful that at least one of my children is willing to enjoy the wonderfulness that is an artichoke.  The other thing I'm grateful for?  Just how easy it is to prepare an artichoke with a pressure cooker.
Ready to go...don't they look beautiful?
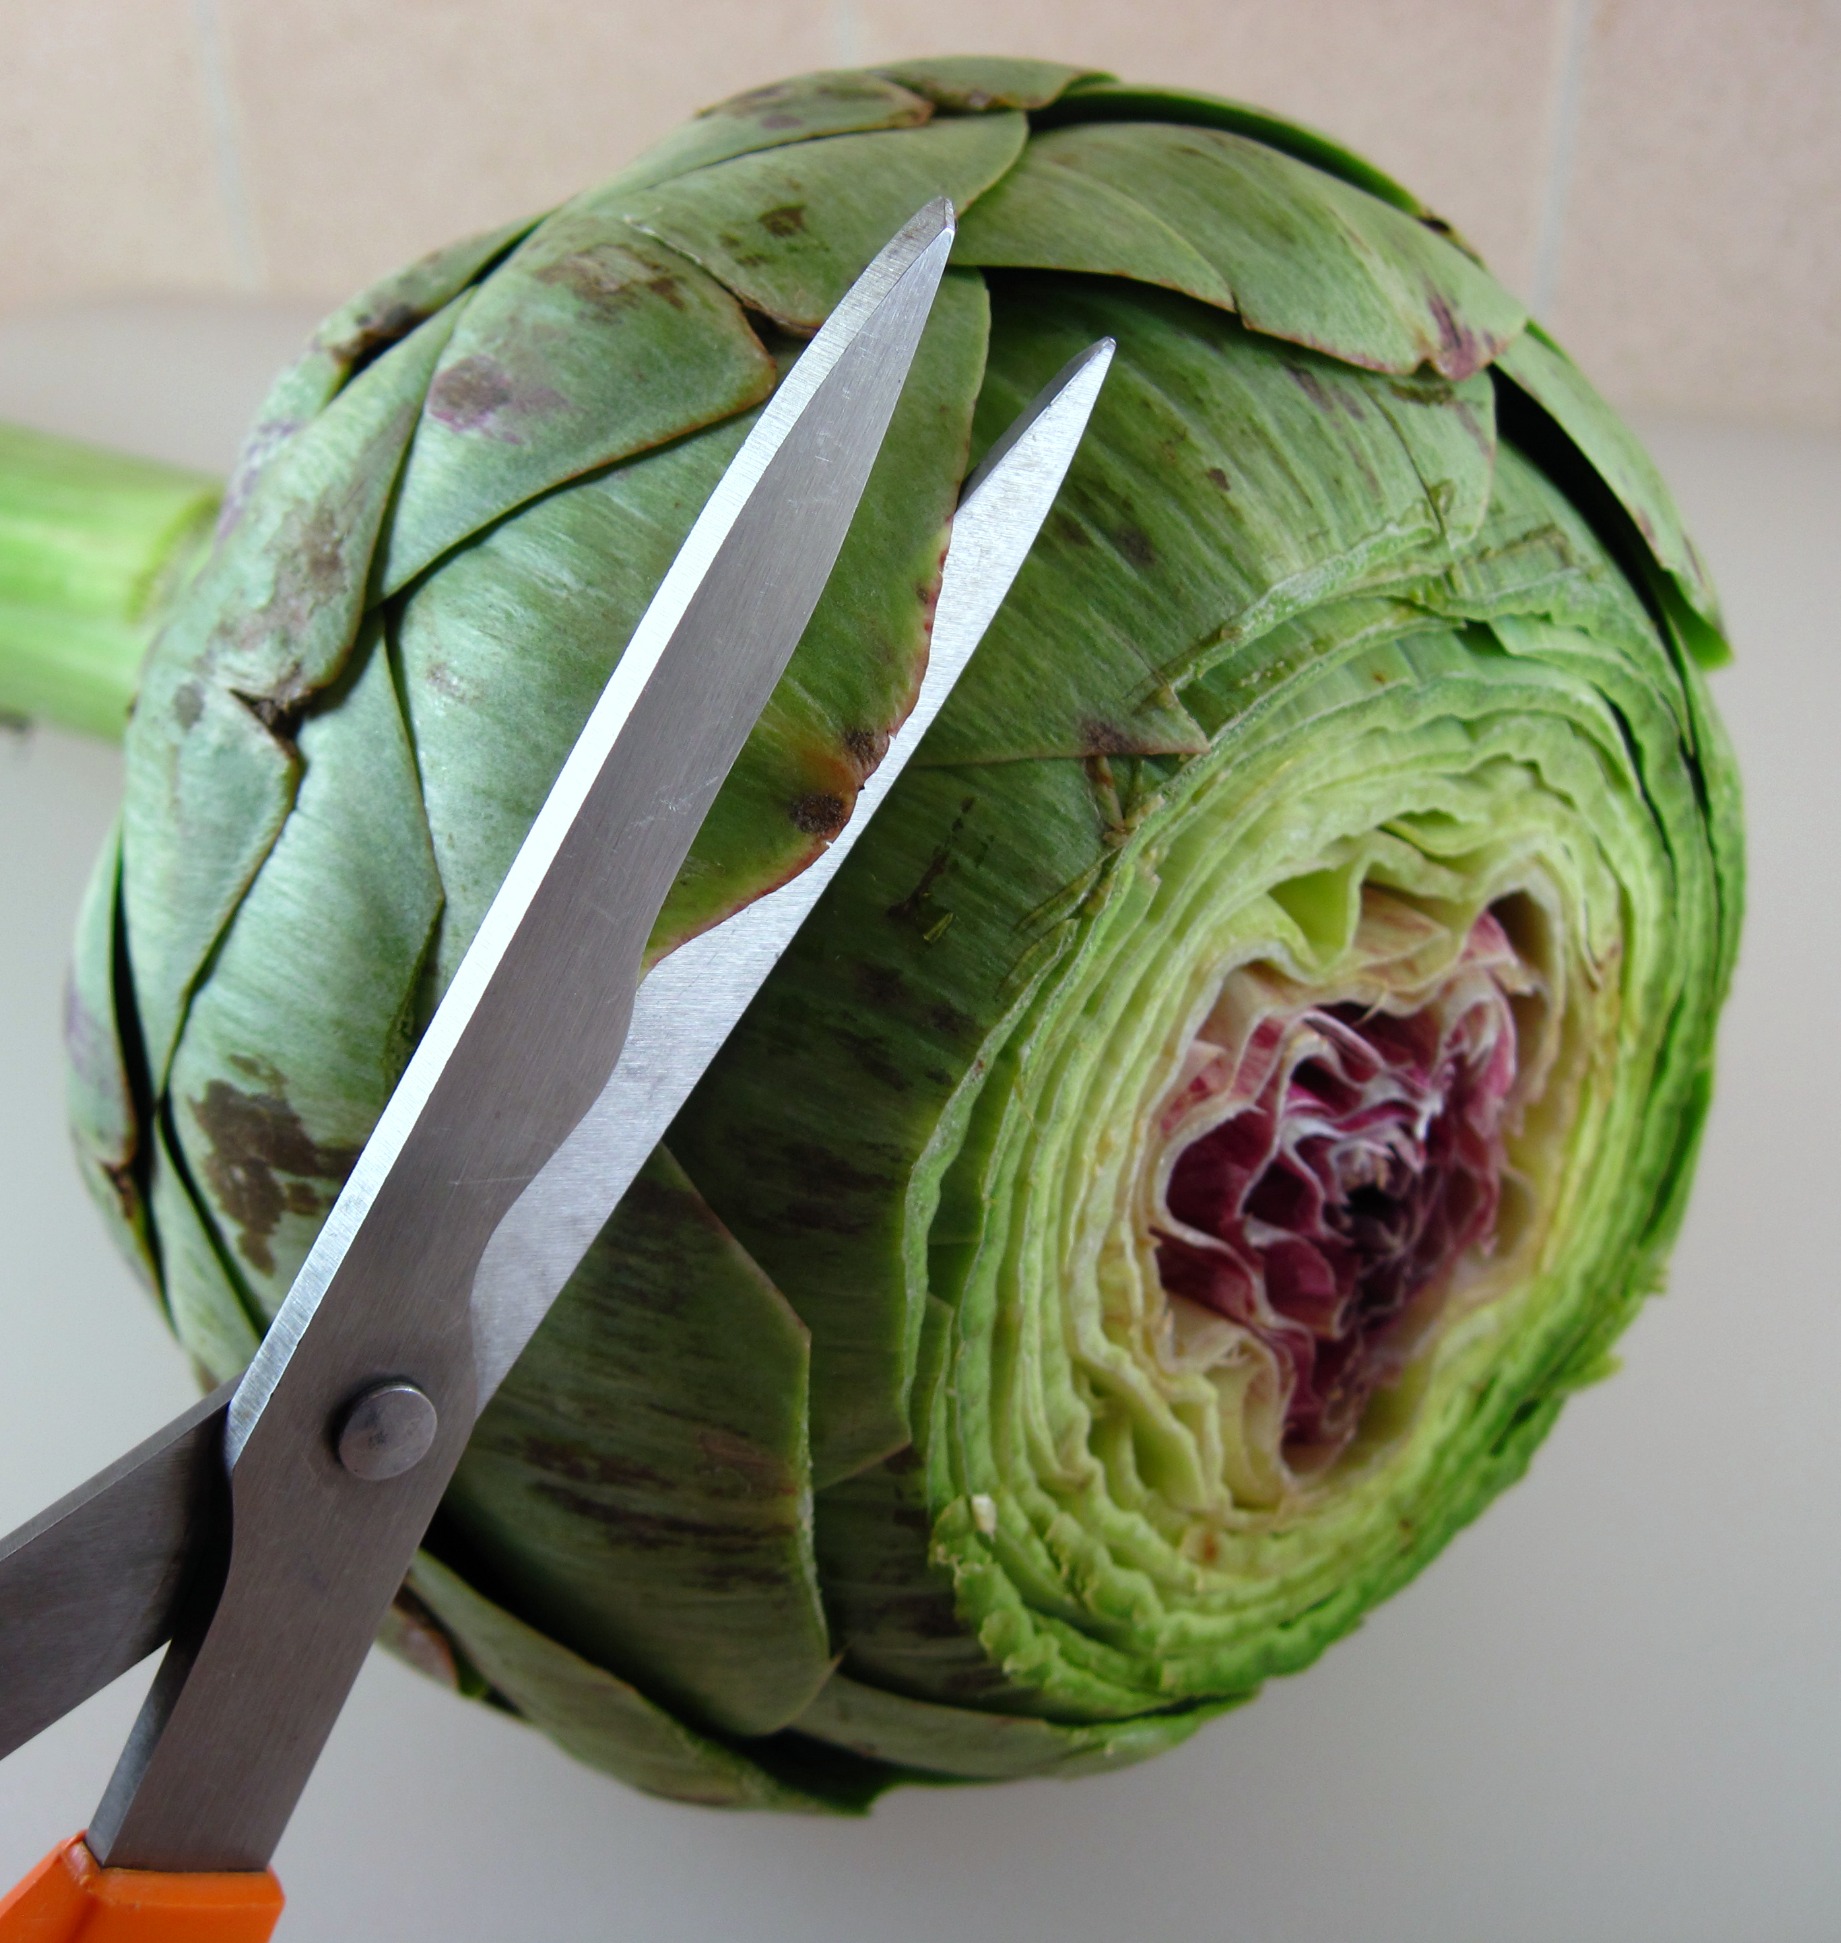
Seriously, it is that easy.  First thing you do is rinse your artichoke.  Pat it dry and trim the top.  Then you take your kitchen shears and cut off the pointy tips of all the leaves.  Then you cut it in half and cut out the choke (the "fur").

Lemon to keep the artichokes from turning too brown and garlic for, well, garlic flavor!
This is what you'll be left with.  Set both halves in your pressure cooker in a steamer basket.   Squirt with lemon and sprinkle with garlic.   Add two cups of water.   Close up your pressure cooker and turn on the heat!

My old-school pressure cooker.  I just turned the flame on high and waited for the
pressure valve to bobble!
Wait 10 to 12 minutes from the time the pressure valve starts bobbling.   I have an old-school pressure cooker.  The little top starts bouncing back and forth on little bursts of steam.  When it settles into a rhythm, that is when I set the timer. (Two artichokes takes roughly 12 minutes, one artichoke takes roughly 10 minutes.)  As soon as the timer goes off, take the pressure cooker off the flame and head over to the kitchen sink to do a quick water release.  (Some sites say use cold water; I was always taught to use hot water.)

Look at how beautiful!  Still steaming tenderness and ready to be plated!
One the steam is released, you an open your pressure cooker and view your perfect artichokes.  (Notice that I didn't have enough water and almost steamed it dry, thus the brown water in my pan...oops!)
Look at that Artichoke goodness.  Perfectly done, ready to be eaten!
After that, you can serve your artichoke warm or chill it.  It is your preference.  We like ours warm, with melted butter.  I remember my dad and grandpa liked it mayonnaise (ick!). 

If you use your homemade mayonnaise, this is purely Paleo!
(We used grass-fed butter, so it didn't make the cut!)
Sit down, peel off those leaves one by one, scraping your teeth across the meaty goodness, unlocking the heart.  Then, cut that heart into chunks and swirl it what is left of your butter (or mayo) and savor its sublime goodness!  Before you know it, you'll have nothing left but scraped leaves on your plate and a smile on your face.  Just remember:  Don't put those leaves in the garbage disposal...they will ruin it!!  Nope, artichoke parts are compost or trash only!

All that is left...leaves for the trash and the memory of a perfect artichoke!


Wednesday, May 9, 2012

Days 8 & 9 - 30 Paleo Challenge - A New Driver's License, A Climber, and Some Egg Salad!

My computer has been having issues the past few days and with my IT guy still a little more than a month from being home on leave, it is making me crazy.  That doesn't mean we haven't been doing the 30 Day Paleo Challenge, though...some of us are still going strong.  (Some of us, not so much!)

So, let's get going!  First things first...my second child now has his driver's license...what a mixed bag for Mom, right?  Seriously.  I gave Valiant his last stern warning the day before he tested, as he was giving me a bit of attitude (your 16-year old son doesn't give you a bit of attitude?  really? hmmm...I'm not sure I believe you).  I finally looked at him and said, "Look...you are asking me to give you the power to kill yourself and/or others and the tool to do it with, so you're just going to have to deal with me being concerned.  This is the biggest act of faith your parents have had to go forward with, so cut me some slack."  I'm happy to report that gave him pause.  The next morning, he passed his driving test and became the proud possessor of a driver's license.  He's pretty darned tickled and I confess to being really happy to have another driver in the house.  Let the next parenting challenge begin!

In the meantime, while my Valiant is keeping me on the edge of my seat with visions of automobile disasters, my beloved little Buttercup (not so little, but still little to me) decided to jump in the fray with Women's Climb Night at REI.  Now, you need to understand something.  I've never thought of myself as afraid of heights and I don't really think I am.  However, I've never been one of those people who sees a rock wall and thinks to herself, "Man, I'd love to climb to the top of that...just to see if I can."  Seriously.  That is not who I am.  Ask me if I can lift something heavy and I'll be intrigued with the possibility...climbing, not so much.  But, because God has a sense of humor, that is exactly who Buttercup is.  Off to the rock wall we headed...

Making it look easy!
...and look who climbed all the way up her first try!  You guessed it:  my little Buttercup.  Sigh.

Listening to the belayer at the bottom...how can she hear her way up there?
She wasn't content to do it once, either.  Nope.  When her turn came around the second time, she scrambled right up.  She was frustrated we couldn't stay for her third run, but Valiant still needed a ride home from work, as this was BDL (Before Driver's License)...she really was itching to go again.  (I wonder if there is mountain goat is Superman's side of the family?)  Honestly, she was amazing.  I was in awe of her confidence and her mad skills.  Crossfit has been so good for her...I am so thankful we found it and a box opened near enough to our home to make it worthwhile.

 I didn't want to let her down, so I tried my hand at it.  Honestly, I didn't love it.  I'm not sure I'll ever love it.  Maybe it is just not my thing.

This was far enough for me...my arms were shaking...this is hard!
Still, I made it two-thirds of the way up before I was done.  Not bad for 48-years old...maybe next time I'll make it up to the top.  Oh, please, you know I'll have to go back and try again...now that I've failed, I have to make it up to the top at least once.  Sheesh...

Now on to the food!  Remember a few days ago, I made homemade mayonnaise?  Well, on Day 8 I used some of that wonderful mayonnaise to make some egg salad  (using my pressure cooker hard-boiled eggs) and it was phenomenal.  After sitting all night in the refrigerator, the mayonnaise was just, well, mayo.  I was worried that I'd taste the lemon and I didn't.   It really was better than "Best Foods"...who knew?


Dinner Day 8 was CORN: Clean Out Refrigerator Night.  We used up all the little bits and pieces left from the previous week and had a Paleo feast.  Dinner Day 9?  We had dinner with friends who did their very best not to undermine our challenge:  Steak, Salad, and Fruit Salad for dessert.  (They had potatoes available, but we declined.  Pretty cool, right?

Oh, and I made it to the gym both days...had pretty decent performance, too.  Got a new PR (personal record) for my 3x Deadlift on Monday and had a not-embarassing time on the scaled Diane (which was also a PR, but when it is scaled, I don't really count it much...I can't do a handstand, let alone a handstand push up, but, hey, they're on my CF to-do list!).    Rowed 2000 meters in under 9 minutes on Tuesday...pretty cool, right?

Monday, May 7, 2012

Day 7 - 30 Day Paleo Challenge - A First Job, Cute Toes, and a New Recipe

Woot!  The conclusion of our first week of the 30 Day Paleo Challenge...it seems silly to admit it, but I just wasn't sure any of us were going to make it this far.  Valiant has thrown in the towel, but Buttercup is chugging right along...sticking to it, despite some missteps.  Me?  I'm actually doing really well. Didn't manage to get enough sleep (although that might have something to do with the fact that we stayed up til almost 2:00 a.m.).  As for eating, I wondered how I'd recover from our deviation for Cinco de Mayo and I am pleased to report I had strict adherence today.

Cheerful Box Boy!
Did I mention that Valiant is now among the gainfully employed?  Yes, it is true.  His hard work (and great appearance) paid off and in one week he was offered two jobs.  He took the job that got the ball rolling first, but would have been happy with either of them. 

He has already worked a few shifts and can hardly wait for that first paycheck.  What is he doing?  Well, he's a "courtesy clerk" (box boy!) at a local grocery store.  The most amusing part?  He has to wear a tie.  That just cracks me up. 

A first job...what an exciting thing.  Do you remember yours?  After babysitting and housework, mine was McDonald's.

I ask him to pose for a picture before work today.  He even granted me a boon and gave me a small smile.  The things his mother asks of him...


Summer toes!

While the boy was at work, the girl and I headed off for some girl time:  pedicures!  Flip flops in hand, we headed out.  (Do you remember when flip flops were thongs and thong didn't reference lingerie?  Man, I'm old!)
I confess that I didn't really need polished toes as much as I "needed" to sit in the massage chair and soak my feet.  Don't you love those massage chairs?  Buttercup told me we needed one at home.  Being a good mother, I told her she should ask her father.  Poor man.

Anyway, she went with neon orange and flowers.  Aren't they cute?  Can you tell we are desperate for summer to get here?   These are definitely "summer" toes.


Finally, dinner tonight was a new one for me and it was a screaming success!  This one came from The Primal Blueprint Quick & Easy Meals and lived up to the description.  It was a recipe for Pork Chops and Shredded Brussel Sprouts which was fabulously simple. 


A little deviation:  I added bacon to our brussel sprouts.
The best part?  After a day of being sure they were going to hate it, the kids told me it was fabulous.  Sadly, they didn't stop there and went on at length about how surprised they were that I fed them something edible.  Still, the praise was sincere, so I'm keeping it!

Day 7 was a good one...can you tell?

Tuesday, November 8, 2011

Easy Slow Cooker Pot Roast

Pot roast has always been one of those meals that intimidated me.  Really.  I'd hear stories of dredging in flour and then browning and blah, blah, blah.  Honestly, I made it one time, seven years ago, and decided it was way too much work.  A friend of mine served it for her family all the time and kept saying how easy it was.  Finally, she told me exactly how she did it and I decided I could handle her method.  I've made it three times now and it has turned out so well each time, I just had to share it with you.  You'll be amazed at how easy this is.

Slow Cooker Pot Roast
(roughly 6 hours)

Frozen Chuck Roast
1 cup of water
1 Tablespoon of Beef Better Than Bouillon
1/2 White Onion Chopped
Salt & Pepper
Vegetables (carrots, potatoes, turnips, etc.)

Directions:
Place the frozen roast in your crock pot.  Add one cup (or so) of water and the beef Better Than Bouillon (I don't even stir it in, just "plop" it in and move on).  Salt and pepper the pot roast to taste.  Cover with chopped onions.   Add whatever vegetables you want with your pot roast...we added carrots this time.  Set crock pot to low and come back in approximately six hours.  That's it.  It just can't get any easier than that.


The roast will be tender, the vegetables will be perfect, and the broth will be amazing!  As for me, I'll never think of pot roast as intimidating again.

Saturday, June 11, 2011

This is Primal - Chicken Salad

Another simple primal dinner.   A hectic day and a hungry family meant my time was short.  This type of salad is great for days that you're out of time or just don't want to "cook".  The ingredients can be whatever your family likes.  I used what I liked and the kids modified theirs to their tastes.   Chicken salad on romaine lettuce with tomato, avocado, and black olives.  Buttercup used tuna for her salad...the possibilities are endless. 
Quick, easy, delicious and primal. 


Canned meat with mayonnaise*
Lettuce
Tomato
Avocado
Black Olives
Salt and Pepper

*  One caveat...to be truly primal, you shouldn't use store-bought mayonnaise.  Store-bought mayonnaise has soybean oil which is not a "good" fat.  For me, I am using up our old mayonnaise before I a) find "good" mayonnaise or b) learn to make my own.  Store-bought mayonnaise falls into my "not perfect" category and I deal with it.

Tuesday, June 7, 2011

This is Primal - Eggs Over Easy with Bacon and Spinach

People always ask me, "But what do you eat?"

The answer?  I eat more and better than I've ever eaten before.  I have no food guilt...I never feel deprived.  Grains are just off the menu, so there is no "choice" to be made.  If you don't have it available, you can't make a choice that goes against your goals, right?


This morning we had eggs (over easy) cooked in the bacon fat from the Fletcher's bacon.  I threw a handful of spinach on the griddle, too, and sauteed it in the bacon fat, too.  Quick, easy, and terrific.


This is primal.

Tuesday, May 31, 2011

This is Primal...

Saturday, I made my first-ever roasted chicken.  People have been trying to tell me for years that roasted chicken was not beyond me, but I've really never believed them.  Now I am a believer!   Not only was it super easy, it was definitely "primal".  Got the recipe/technique from The Primal Blueprint Cookbook.  The kids said it was the best ever roasted-chicken they've ever had.  Even the leftovers were moist!  (I thought it was darned good, but I think I was a little too timid with the seasoning.)


Dutch-Oven Herb Roasted Chicken
(adapted from The Primal Blueprint Cookbook)

Ingredients

1 Whole Roasting Chicken (washed and dried, with the cavity emptied of the goodies like the neck!)
1 Tablespoon "good" fat (poultry fat, ghee, olive oil, or non-hydrogenated lard) (I used ghee)
1/2 cup finely chopped onion
4-6 cloves of garlic (I used garlic powder--probably 2 teaspoons- we like garlic)
1 teaspoon salt (the recipe called for "coarse sea salt", I had coarse Kosher salt)
1/4 teaspoon freshly ground black pepper
1/4 teaspoon dried basil (I added this...wanted mine to be herb-y)

Directions:
1) Preheat oven to 250 F.
2) Using a dutch oven (or oven-safe roasting pan with a lid), melt fat on stove over medium heat.
3) Salt and pepper the chicken and then place breast-side down into the dutch-ove/roasting pan.  Add in onions, garlic, and basil.  Let cook uncovered for 8 minutes.
4)  Turn chicken and cook for additional 8 minutes.
5)  Remove from stove, add lid, and put the chicken in the oven.
6)  Cook from 1 1/2 hours to 2 hours (depending upon the size of your chicken...4 lbs take 1 1/2 hour, bigger takes longer)...my Costco chicken took 2 hours.
7)  Remove from oven and let sit for 20 minutes.  Serve with wonderful vegetables and enjoy.

That's it.  Roasted chicken (not breaded chicken) is primal, as long as you use good fats to brown it before putting it into the oven.

Told you it was easy.

Did I mention it was fabulous, too?

Tuesday, September 28, 2010

Harvest Pumpkin Brownies

Leaves turning colors, the nights turning cold, and the smell of cinnamon, ginger, and cloves wafting through the house...they are the familiar signs of fall.  Last week, as the weather turned brisk and the season officially changed to Autumn, I made two batches of Harvest Pumpkin Brownies topped by Cream Cheese Frosting.  One was for the 'we-call-it-a-book-club-but-no-one-cares-if-you-read-the-book book club' and the other I divvied up throughout the neighborhood.  (Hey, it was fall everywhere, right?)


Harvest Pumpkin Brownies
from Mrs. R.

Ingredients:

For the Cake:
1 can/16 oz. of pumpkin
4 eggs
3/4 cup vegetable oil
2 tsp vanilla extract
2 cups all-purpose flour (I did half all-purpose/half whole wheat)
2 cups white sugar
1 Tablespoon pumpkin spice
2 teaspoons ground cinnamon
2 teaspoons baking powder
1 teaspoon baking soda
1/2 teaspoon salt

Frosting:
6 tablespoons butter (softened)
3 oz cream cheese (softened)
1 teaspoon vanilla extract
1 teaspoon milk
1/8 teaspoon salt
1 1/2 to 2 cups confectioner's sugar (I cut the sugar in half and it was perfect!)

Directions:

For Cake:
Preheat Oven to 350 degrees. Grease and flour a 9 x 13 pan.

In medium bowl, mix together flour, sugar, pumpkin pie spice, cinnamon, baking powder, baking soda, and salt. Set aside.

In large bowl, mix together pumpkin, eggs, oil, and vanilla until well-mixed. Stir in dry ingredients and mix well.

Pour into 9 x 13 pan and bake at 350 for 20-25 minutes (mine took 30 minutes). Cool.

For Frosting:
Mix together butter, cream cheese, vanilla, milk and salt until smooth. Gradually add confectioner's sugar until you get a creamy consistency. Spread frosting on top of cake and serve.


I still think the term "brownie" isn't quite accurate. It seems more like a dense cake to me. You can see just how moist it is from the picture, can't you? Regardless, it is amazing and you'll be glad you made it.

Happy Fall!

Tuesday, September 7, 2010

Scalloped Potatoes

I recently went through my recipe folder and culled many of the recipes into either "I'll never try this" and "I need to try this".  I've committed to myself to try one or two new recipes each week. 

This evening, I nabbed this recipe for scalloped potatoes.   (The pictures had to be taken after the meal, the kids just couldn't wait!)  Anyway, I was intrigued by the fact that the author noted that she found this recipe when she was looking for some way to use her old potatoes.  I have old potatoes that definitely need to be used, so this was right up my alley.

We haven't had a lot of scalloped potatoes in our house, because I don't do that Betty Crocker stuff and never thought to find a recipe for them.  What that means is that I can't compare them to a lot of other scalloped potatoes, but I can tell you that my kids loved them.  Seriously loved them.  They were really easy to make, clean up was a breeze, and they were a good way to use up these old potatoes.

Scalloped Potatoes
(source:  unknown blogger)
Serves 6 - 8

Ingredients:
4 cups sliced potatoes
2 cups scalded milk
2 tablespoons flour
1 teaspoon salt (next time, I'd up this)
1/8 teaspoon pepper (I'd up this, too)
3 tablespoons butter
1/2 cup grated Cheddar cheese (I didn't measure, I just sprinkled)

Instructions:

Preheat oven to 375F.

In a small bowl or cup, mix together flour, salt, and pepper.  Set aside

In buttered 2-quart baking dish (I used 8 x 8 pyrex dish), place layer of 1/3 of the potatoes.  Sprinkle with 1/2 the flour mixture, then add another layer of the potatoes, followed by the other half of the flour mixture, and top with remaining potato slices.

Dot with the butter and then pour the hot milk over the potatoes.  Cover and bake at 375F for 45 minutes.  Uncover and sprinkle the cheddar cheese and back for 15 more minutes or until scalloped potatoes are tender and cheese has melted.   Serve.


Quick, easy, and good...what else can you want in a recipe?

Wednesday, August 11, 2010

Banana Oat Bread - Delicious, but not Deliciously "Light"


I found this recipe on Momadvice a few years ago and I love it.  It is called Deliciously Light Banana Oat Bread and it is really good, even if the name doesn't fit.  It is NOT light.  It is hearty.  The oatmeal makes it more substantial and less prone to "mushiness" than other banana bread recipes.  The buttermilk makes it have a richer taste.  This is the recipe I like when I have quite a few bananas that have gone passed their ideal "use by" point.

Seriously, look at those oats!  It is so rich and hearty, it is fantastic...just don't expect it to be light.


Deliciously Light Banana Oat Bread
(from Momadvice - makes two loaves)

Ingredients:
3 cups flour
1 1/3 cup brown sugar
1 Tablespoon baking powder
1/2 teaspoon baking soda
1/2 teaspoon salt
1 1/2 cup rolled oats
2 teaspoon cinnamon
2 cup mashed banana (approximately 2 1/2 per loaf)
2/3 cup buttermilk
1/2 cup vegetable oil (I used coconut oil)
2 teaspoon vanilla
4 eggs, beaten
Cooking spray

Directions:
Preheat oven to 350°F and spray a 8 x 4 inch loaf pan with cooking spray.

Combine dry ingredients together in a large bowl.

Combine banana, buttermilk, oil, vanilla, and eggs in a small bowl or measuring cup.

Pour wet ingredients into the dry ingredients and stir gently just until the dry ingredients are moistened. Spoon batter into the prepared pan and bake for 55 minutes  or until a toothpick inserted in the center comes out clean (mine came out at 50 minutes).

Cool on a wire rack, in the pan, for about 15 minutes.  Remove the bread from the pan after 15 minutes and cool thoroughly on the rack.

Saturday, July 31, 2010

Do you have one of these? (UPDATED WITH PHOTO)

Everyone I know seems to have one of these on their shelves.  I've had mine for so long, I stopped "seeing" it years ago.  That all changed a few months ago.  A neighbor and I were combining efforts to make dinner for our two families and one of her contributions were these amazing dinner rolls.  Buttery and soft, they were melt in your mouth rolls.  My kids went crazy for them.  "Mom, you have to get the recipe for these.  They are amazing."  So, I asked my friend for the recipe.  She replied that I had it already, in my Better Homes and Gardens New Cookbook.  Really?  Huh...  So, we whipped out my version of the cookbook and there it was, just as she said it was.


Fast forward a few months and it was my turn to head over to the neighbors with my contributions to the meal.  She was making stew, so I thought the rolls would be perfect.  Again, they were amazing and easy.  They were good enough, in fact, that I think you should make them yourself.


 Plain Dinner Rolls - Cloverleaf Rolls
From Better Homes and Gardens New Cookbook
Makes about 24

Ingredients
2 1/4 teaspoons active dry yeast (1 pkg)
1/4 cup water, warm (110 degrees F)
1 cup milk, scalded
1/4 cup sugar*
1/4 cup shortening*
1 teaspoon salt
3 1/2 cups all-purpose flour
1 egg
1 stick butter, melted

Instructions:
Activate yeast in water.  Set aside

Combine milk, sugar, shortening, and salt; cool to lukewarm.

Add 1 cup flour to milk mixture, beat well.  Beat in softened yeast and egg.  Gradually add remaining flour to form soft dough, beat well.

Cover and let rise in warm place until it doubles in size; about 1 1/2 hours. 

Preheat oven to 400 degrees.  Grease standard muffin tin.  Turn out dough on lightly floured surface and shape dough into small balls (about an 1" in diameter).  Three should half-fill a muffin cup.  Melt butter and put a teaspoon of butter on each muffin.  Let double in tin and bake for 10 to 12 minutes.

Notes:  Interestingly, my friend's version of this cookbook is the 1953 version, while mine is the 1965 version and some of the recipes have been slightly modified from their original versions.
*The roll recipe in my version uses 1/4 cup of sugar and 1/4 cup of shortening only as an alternative version of the recipe for richer rolls and actually calls for 2 tablespoons of each.  (Trust me, you'll prefer the 1/4 cup version.)

(UPDATED BY ADDING A PICTURE OF THAT SEEMINGLY UBIQUITOUS COOKBOOK)

Wednesday, April 7, 2010

Thick, Chewy Oatmeal and Chip Cookies

The other night, I wanted something sweet. I really, really wanted Thick, Chewy Oatmeal Raisin Cookies (find the original recipe from February 2009 post here). Unfortunately, I am out of raisins. In fact, I'm running low on a lot of baking stuff and, since I don't have a place to send all my baked goods, I'm not baking nearly as much. But that wasn't helping me during my craving. What could I do? Duh...I improvised. I took my favorite oatmeal raisin cookie and substituted with what I could find which was roughly 3/4 a cup of chocolate chips and half a bag of butterscotch chips. The kids loved them and, since there weren't that many butterscotch chips, they still weren't too sweet. I think you can substitute any kind of chip you have (in place of the raisins) or, you can go absolutely crazy and have chips and raisins! Live on the edge!


Thick, Chewy Oatmeal and Chip Cookies

1 cup of butter - softened (two sticks)
1 1/3 cups of brown sugar - packed
2 eggs
1 tsp vanilla extract (oh, please, why do recipes always say 1 teaspoon - I always use more!)
1 1/2 cups of all-purpose flour
1 tsp baking soda
1 tsp cinnamon
1/2 teaspoon salt
3 cups oats
3/4 cup chocolate chips
3/4 cup butterscotch chips
1 cup chopped walnuts (um, I left these out, as always!)

Preheat oven to 350 degrees.

In a large bowl, cream together butter, brown sugar, eggs, and vanilla.

In separate bowl, whisk together flour, baking soda, cinnamon, and salt. Combine with butter mixture, then add oats, chips, and nuts (if you're using them!).

I used my Pampered Chef scooper and put them on an ungreased cookie sheet. Bake for 12 minutes or until bottom looks golden and the tops look not quite done. Leave on the cookie sheet for five minutes before transferring to cooling rack.

P.S. Just to make you laugh, I thought I'd let you know that I am on my third day of the 30 Day Shred! Yep, I'm doing it again...it works that well.

Wednesday, March 3, 2010

Whole Wheat Waffles

My friend DarcyLee over at Darcy's Kitchen Kapers (and In This Season) posted this recipe for Whole Wheat Pancakes and Waffles and I knew right then and there I had to try it. This recipe definitely lived up to its first impression...the results were seriously good. I did make a few changes to suit my needs, but I followed her recipe as a guideline. Confession: I still hate using my waffle iron, but I must admit that I'll probably be doing it a bit more now that I have this recipe. They are that good.


Whole Wheat Waffles

adapted from Darcy's Kitchen Kapers
(makes 16 little or 4- 4 square waffles)

1 cup whole wheat flour
1 cup all-purpose flour
1 tbls ground flax seed
2 tablespoons sugar
3 teaspoons baking powder
1 teaspoon salt
1/2 teaspoon soda
2 cups buttermilk
1/4 cup melted butter
2 eggs

In large bowl, combine first 5 ingredients.

Add remaining ingredients; beat (or stir) just until large lumps disappear.

Heat waffle iron. Follow instructions above for mixing ingredients together. Bake in hot waffle iron until steaming stops (my waffle iron has a light that tells me when it is done) and waffle is done to a golden brown.

There you have it...simple, wholesome waffles. What more can you ask for in recipe?

DarcyLee has an awesome looking recipe for White Chili as well as a scrumptious looking Lemon Greek Chicken that I'm dying to try. Head over to see what she's been whipping up. If the waffles are any indication, you'll love her recipes.

Sunday, December 20, 2009

Super Cute Snow Men

The shopping and baking continue. I thought I'd pause to share another gratifying recipe before I head back to the trenches (okay, the kitchen!). This recipe is a family favorite. It is quick, easy, and super cute. Who can resist these adorable snow men? Snowmen Butter Cookies Makes - 12 Ingredients: 1 cup butter, softened 1/2 cup granulated sugar 1/4 teaspoon vanilla extract 2 1/2 cups all-purpose flour 1 teaspoon water Red and green liquid or paste food coloring Black/brown jimmies and red hot candies (cinnamon candies) (eyes and noses) Directions: In a large mixing bowl, cream butter, sugar and vanilla extra together. Gradually beat in flour and water. Place 1/2 cup of dough in each of two bowls, reserving balance in separate bowl. Add red food coloring to one bowl and mix thoroughly. Add green food coloring to one bowl and mix thoroughly. Shape the uncolored dough into twelve 1-inch balls and twelve 1 1/2-inch balls. Place one smaller ball above one larger ball to form the snowman body and head. For each snowman, then form the hat and the scarf. For hat, roll 1-inch ball and a flat disk for brim. Place on head. For scarf, shape 1/4 teaspoon of each color of dough into a 3 inch rope and twist together. Place scarf around snowman's neck. Insert jimmies for eyes and press the red hot in for the nose. Bake at 350 F for 15-18 minutes until set. Cool on baking sheet. Come on! You have to admit that these are super cute!

Thursday, December 17, 2009

One Week Left! Christmas Baking Time

Can you believer it? There is only one week left to get ready for Christmas. In the last day and a half, I've done my very best to get the Nagle family Christmas celebration on track. I've been doing some last minute shopping and I'm looking forward to a weekend of sewing and baking.

It has become our tradition give our friends and neighbors platters filled with yummy baked goods right before Christmas. I'll be sharing our recipes with you all weekend, so you can add anything you fancy to your own celebrations.

Tomorrow morning (Friday), I'm going to be making Chocolate Peanut Butter Balls...I remember my mom making these 35 years ago, so this recipe is definitely a keep. Be prepared to fall in love, because these are more like a home-made Reese's Peanut Butter Cups than anything else. As soon as I get them made, I'll share some pictures with you, but if you want a head start, here is the recipe.

Chocolate Peanut Butter Balls
from Erin's mom - makes about 100 balls

1 cup butter - softened
2 cups graham cracker crumbs
1 tsp vanilla extract
1 cup angel flake coconut
1 lb powdered sugar (approx 3 1/2 cups)
1 cup chunky peanut butter (you can use creamy with no problem)

12 ozs chocolate chips
1/4 cake of paraffin wax

Directions:

1. Beat butter until creamy. Add in graham cracker crumbs, vanilla extra, coconut, and powdered sugar. Mix well.

2. Stir in peanut butter with wooden spoon (or upright mixer...this will be too stiff for a hand mixer).

3. Shape into 1" balls and place on cookie sheet. (Note: If you take the time to insert toothpicks into each ball at this point, it will make dipping them in chocolate much easier.) Chill for at least an hour.

4. When balls are chilled, melt chocolate chips together with paraffin and mix well.

5. Swirl peanut butter ball in chocolate and set on waxed paper to cool. Store in freezer or refrigerator.

As I said, I've been making these for years and year and my mother before me made them for years. They are always a big hit and repeat favorite.

Wednesday, December 9, 2009

Nutter Butter Santa Cookies (aka Quick and Easy Festive Recipe)


Who doesn't want cute, quick, and easy cookies to bring an air of festivity to a gathering? This recipe fits the bill completely, even if you don't normally bake. One caveat: If you're worried about peanut allergies, this recipe won't work for you.


Nutter Butter Santa Cookies

Ingredients:
1 package - Nutter Butters
3 or 4 blocks of Almond Bark (found in bakery section of your grocery store)
Red Decorating Sugar
White Chocolate/Vanilla Chips
Red Hots
Mini Chocolate Chips

Directions:
Line a cookie sheet with foil or parchment paper.

Open package of Nutter Butters.

Melt Almond Bark in microwave according to directions on package. (Hint: use a taller, narrower container as it will make it easier later on.) Put decorating sugar in a cup.

Dip each Nutter Butter about 3/4" into the melted Almond Bark. Then dip the same end into the red sugar. Lay on prepared cookie sheet. Repeat until all cookies have been dipped. (Move relatively quickly, as you don't want the almond bark to cool before you're done.)

Once all the cookies are laid out on the cookie sheet, get a toothpick or small knife and dip it into the Almond Bark. Use melted Almond Bark to coat the bottom of a white chocolate chip and add the "tassel" to the Santa hat. Do the same for the mini chocolate chips (the eyes) and the red hot (the nose). Repeat for all the cookies. Let them cool completely and you're done!

10 or 15 minutes from start to finish and you have super cute Santa cookies, sure to please everyone.

Note: On the cookies pictured, we used Royal Icing for the tassel (no white chocolate chip) and as the glue for the eyes and nose because we had made Royal Icing for the gingerbread houses and cookies. As you can see, use a squirt bottle and it works just as well.

Tuesday, November 17, 2009

So, I promised you a recipe...

And here it is: Super Soft Chocolate Chip Cookies. This recipe comes from Take It and Like It and I know it sounds so basic, but what caught my eye about this recipe was the Brooke's promise that they were truly chewy. I like my chocolate chip cookies chewy. I don't like them crunchy...ever. Since that was basically what Brooke promised, I had to go for it. But, in an effort for true transparency, I must confess that I've never made them...even though four batches have been made at our house. Yep, you read that correctly. I'm not the one making cookies in the Nagle kitchen these days. Instead, it seems like both Valiant and Buttercup have taken over cookie duty. (Could that be because I'm more focused on getting fit than trying new dessert recipes? Is that even possible?) Anyway, Buttercup has fallen in love with this recipe and I have to agree with her...it is a terrific basic chocolate chip cookie recipe that never fails.*

So, without further ado, here it is:

Super Soft Chocolate Chip Cookies
from Brooke at Take It and Like It

Chocolate Chip Cookies:
1 1/3 cups butter
1 cup sugar
1 cup tightly packed dark brown sugar (we used light brown sugar)
2 eggs
2 tsp vanilla
1 tsp baking soda
1/2 tsp salt
3 1/2 cups flour
5-6 ounces (1 cup) chocolate chips

Directions:

Preheat the oven to 375F/190C.

In a large bowl o
r stand mixer cream together the butter and sugars, then beat in eggs and vanilla.

Stir in baking soda and salt, then mix in the flour until well combined.

Add chocolate chips.

This dough will be quite stiff, so if you have a stand mixer use it! Drop dough by rounded tablespoonfuls about 2 inches apart onto a baking sheet. (We used our Pamper Chef medium scooper.) Bake for 8-9 minutes or until light brown (the centers will be soft), then remove to cool on cooling rack.


* Okay, you can have an issue if you forget how to do fractions, but that tends to be a 10-year old problem and I think most of you should be fine!

(No pictures - Blogger isn't letting me upload them right now.)

Wednesday, October 21, 2009

Pumpkin Swirl Cheesecake

Pumpkin Swirl Cheesecake...doesn't that sound fabulous. I saw this recipe on Tasty Kitchen, the new recipe blog started by Ree Drummond aka The Pioneer Woman. It was posted by Cheryl at Cooking, Dunkin Style. If you haven't found Cheryl's blog, you've missed a great cooking blog and I urge you to head over and take a look.

Anyway, today is Friday Delight on Thursday and I sent Superman off with two Pumpkin Swirl Cheesecakes. I didn't taste them, but they looked amazing (and the batter was fabulous, too). This recipe is really quite easy and the pumpkin makes it perfect for fall, don't you think?


Pumpkin Swirl Cheesecake
from Cheryl at Cooking, Dunkin Style

Ingredients:
· Crust (see Notes below): (I used two graham cracker crusts.)
· 2 cups finely crushed ginger snaps cookies
· 1/2 cup finely chopped pecans
· 6 Tbsp butter or margarine, melted

· Filling:
· 3 packages (8 ounces each) cream cheese, softened
· 1 cup sugar, divided use (I used extra fine sugar)
· 1 tsp vanilla
· 3 large eggs at room temperature
· 1 cup canned pumpkin (not pumpkin pie mix) OR 1 cup cooked mashed pumpkin
· 1 tsp ground cinnamon
· 1/4 tsp ground nutmeg
· 1/8 tsp ground cloves

Preparation:
Preheat oven to 325 degrees F. (300 degrees F. for a dark springform pan) and position the oven rack in the center of the oven.

For the Crust (see Notes below):
Mix ginger snap crumbs, pecans and butter; press onto bottom and 2 inches up side of 9-inch springform pan.

For the Cheesecake Filling:
Using an electric mixer on medium speed, combine cream cheese, 3/4 cup of the sugar, and the vanilla until well blended. On low speed, add eggs one at a time, mixing each time just until blended.

Remove 1-1/2 cups of the plain batter and set aside.

To the remaining plain batter, add remaining 1/4 cup sugar, pumpkin, cinnamon, nutmeg, and cloves. Using a large spoon, stir to combine.
Pour 1/2 of pumpkin batter over crust in springform pan. Spoon 1/2 of plain batter over pumpkin layer. Repeat until all batter is used.

Using a long butter knife, gently swirl through all layers of cheesecake batter without disturbing crust to achieve a marbled effect.

Bake for 55 minutes or until center is almost set. Do not overbake. Use a thin knife around the edge of the pan to loosen the crust.
Cool completely on wire rack.

Remove outer pan and refrigerate at least 4 hours, preferably overnight, before serving.

Notes for Optional Pie Crust: If you don't want to bother with a springform pan, purchase or make two small or one 10-inch oversize graham cracker or gingersnap pie crust shells. Skip the crust part of this recipe above and proceed to the fillings. Divide both fillings equally between the small pie crust shells or use same instructions for large crust and swirl. Bake at 325 degrees F for about 40 minutes for the small crusts and 45 to 50 minutes for the large.

Wednesday, October 7, 2009

The last of the garden crop...

has yielded lots of green tomatoes (they'll ripen in paper bags), a few zucchinis, and one more little pumpkin. By the end of this coming weekend, the plants will be pulled up and the compost will be laid in preparation for winter and next spring's planting season.


In the meantime, I have one more recipe that uses summer's bounty. This Chocolate Chocolate Chip Zucchini Cake is to die for, seriously. I have to tell you, Superman was not happy to hear that he was getting a cake that had zucchini in it. Truly. He thought it was going to be awful and he tried the first piece under duress. (What? You thought he'd willingly eat cake with zucchini in it? Oh, please!) And what about the kids? Yep, you guessed it. They were right there with Superman. So, imagine their surprise when they all LOVED it. Seriously loved it.

So, where did this amazing recipe come from? I found it the same place I found the one-hour bread recipe. Yep, La Fuji Mama came up with another winner. How often do you get to eat your cake and your vegetables, too?

If you've got a little bit of zucchini left, give this recipe a try. I promise you'll be thrilled you did.

Chocolate Chocolate Chip Zucchini Cake
Sourced from La Fuji Mama who adapted it from Allrecipes.com
Makes 1 standard size bundt cake

6 Tbsp. cocoa
2 Tbsp. butter, softened
2 cups granulated sugar
3 large eggs
1 cup vegetable oil
2 cups grated zucchini, packed
1 1/2 tsp. vanilla extract
2 cups all-purpose flour
1 tsp. baking soda
1 tsp. salt
1 1/2 tsp. ground cinnamon (I left these out...we just don't like cinnamon with chocolate)
1 cup semisweet chocolate chips

1. Preheat oven to 350 degrees Fahrenheit. Lightly grease bundt pan.

2. In a large bowl, combine cocoa, butter, and sugar. Add eggs, oil, grated zucchini, and vanilla; beat well. Stir in the flour, baking soda, salt, and cinnamon. (Remember, I left the cinnamon out.) 3. Place chocolate chips in sifter and toss with a bit of flour (sifting off the excess) (this is to help your chocolate chips from all sinking to the bottom of the cake batter once your cake is in the oven).

4. Fold in the chocolate chips. Pour batter into prepared bundt pan.

5. Bake in preheated oven for about 70 minutes, or until a toothpick inserted into the center of cake comes out clean.

6. Let cool for several minutes, then unmold cake onto cake plate to finish cooling.


See what I mean? This cake is gorgeous. Seriously, what is not to like? I ate it all by itself, but the rest of the family added vanilla ice cream to their servings. Either way, listen to Superman, Valiant, and Buttercup and make this cake...you'll be glad you did!