Showing posts with label easy. Show all posts

Tuesday, July 3, 2012

Rain Gutter Planter

My beloved Superman was home on leave for two and a half weeks and we have some wonderful pictures of that time that I'll be sharing later this week.  In the meantime, I have a quick and easy garden project to share with you.
The flowers wish I had done this project last week.  They'll look better in a few days.
It is so easy.  All you need is a length of plastic/vinyl rain gutter (I got ours from Home Depot) with the anchors and endcaps. 

I guessed how many anchors I'd need, based on the length of the gutter and
the anticipated weight of the dirt and plants when wet.  (50" warranted 4 anchors.)
Put it all together and attach it to a flat, vertical surface.  I attached our to the deck railing with a screw in each anchor.  (Depending upon your plant selections, you will need to decide whether or not you will need to drill drainage holes.) 

The finished planter in place with a drip line ready to go.
Fill it with dirt and add your plants.  Ta da!

The finished project!  I love how it turned out.
That is it...you are done.  Now, at this point, I have to tell you that my children thought this was a stupid idea until it was actually done.  Then, in the high praise of the teen-aged language, they conceded:  "Mom, we kind of thought this was a stupid idea, but now that you finished it, it really looks good!"

So, if you're willing to face teen-aged scorn, I urge you to give this garden project a try.  You won't be disappointed.

Tuesday, May 29, 2012

Kids Backpacks!

I can finally show you the backpacks I made for my niece and nephew in California, as I shipped them off Thursday via Priority Mail, so the recipients have got to have them by now.  These are a quick and easy project and the result is a kid-friendly, soft-sided backpack that is oh-so-washable.  I love that the backpack stays closed while being worn and that there is a good-sized outside pocket.  I used Kwik Sew 2379 (view C) and these are the 3rd and 4th time I've made this backpack and I still love how it turns out.
Two backpacks, plus to little zippered pouches...

Still, judge for yourself:
Boy stuff!
  My nephew got this cute little superhero version.

Love the lining, don't you?
I added a little zipper closure keychain bag in the same fabrics.  (Kids love little pouches and bags for their important "stuff".)

Love the mango lining...it is so cute in real life.
My niece got this very girly Hawaiian print, with the coordinating lining.   It is sooo pink!

Love the white vinyl and cording...
I made a little zippered keychain bag for her, too.

Better view of the little pouches.
I am so pleased with how these both turned out.  I hope the kids get a lot of pleasure from them.

Monday, March 19, 2012

Frugal Animal Beds

With four cats and two dogs, I always have animals laying around.  Seriously.  They're just laying around all over the place.  In the past, I've spent money on animal beds, but oftentimes, they were cheap material that couldn't stand up to washing and I need to wash them...a lot.  I needed a better, but still frugal solution.  Two rag towels, an old floor pillow, and twenty minutes later, I had a fully washable dog bed.  It turned out so well that I wanted to make some more animal bed covers, so I headed to Target and bought their $3.50 bath towels and made two more.  (The rag towels worked well, but I didn't take pictures.)  Here is how I did it:

We just use old pillows for animal beds.
Lay one towel on the floor.  Lay your pillow on top of the towel, closer to one edge of the towel.  Leaving the same amount on the opposite edge, cut off the excess.  Don't discard as you'll be making an envelope closure for this pillow.  (Great tutorial on envelope closures here.)

Lay the pillow you're using on one towel.
Now, pick up the pillow, but leave the portion of the towel that had been under the pillow in place.  Take the piece that you've cut off and lay it on top of the towel, matching the cut-edge to the outside edge of your towel.

Putting the finished edge on the inside makes this a quick project.  Your
envelope folds are already finished.

Now you'll take your second towel and cut it to a length that is one half the width of your pillow and lay it on top of the other two pieces of towel that you've already cut, making sure to put the finished edge on the inside of the pillow, just like you did with the second piece.  Pin all three layers together and sew around the outside edge. 

Sew all around the edge...in some places you'll be going through three layers
of towel...just be sure to catch those inside edge.

Flip your pillow cover right side out and insert your pillow.  Lay it on the floor and see who gets it first.


Cat bed?

Dog bed?  Either way, this one is in Buttercup's room now.


Well, either way, cat or dog, it is an animal bed that cost $7 and twenty minutes to make.  It is oh-so-washable.  Just what we need in this menagerie!

If you don't have a serger, you can just zig zag the edges.
Oh, and you'll have extra toweling.  I cut mine into squares, serged the edges, and got myself a bunch of new washcloths.  Not bad for $7!!


Tuesday, January 31, 2012

Drawstring Backpack

I did a little bit of sewing last week and I must confess to being tickled with how it all turned out.

I used KwikSew Pattern 2379 to make the bag.  Buttercup is a crazy-cat-lady and picked out this adorable cat fabric, plus I had some red vinyl at home.


It was a pretty easy pattern to follow and all the sewing was straight lines.  Honestly, the most difficult part was figuring out how to make holes for the grommets. 


Buttercup really likes it and is wearing it everywhere.  The bag is fully lined (in bright green) and has an outer pocket with a zipper.  The best part is that when you're wearing it, the top is closed and can't be opened without you know it.


"Bun - James Bun"
While Buttercup wanted it in lieu of a purse , it is also a great bag for bringing along your stuff animal du jour.

"Honey the Hamster"
While I still plan to make the bigger backpack included in this pattern, I am so glad I made this one first.  She's getting a lot of use out of it and it was a terrific one to start with. 

Monday, January 23, 2012

Recovering Your Ironing Board

I don't know about you, but I am definitely one of those "out of sight, out of mind" kind of people.  I just don't think about ironing unless the ironing board is handy.  The more I sew, too, the more I realize that ironing is a must for good results.  Realizing this a few years ago, I brought the ironing board out of the cupboard, dusted it off, and put it out.  I quickly realized that the fabric they used to make the original cover was, in my opinion, a) hideous and b) hideous in my room.   Fortunately, I saw this tutorial for recovering an ironing board and had the fabulous results I shared here.  It has been three years since I recovered both my big ironing board and my desktop ironing board and with the "mango madness" orange transformed to "celery sprig" green, the fabrics I loved so much then do not make me smile now.  Still, I'm using my ironing boards a lot, so they need to stay out.  Finally, as my beloved Superman commented, they stand out like a sore thumb in the serenity of my "new" space. 


Orange really isn't the look I was going for here...
 Clearly, a change was needed.  I headed out to Hancock Fabric and found a fabric that would make me smile.  (Yeah, the smiling thing...if I have to look at something all the time, I want to like looking at it.)  Now, I could have done like before and reused the casing the the strings from the original board covers.  (See it here?  You can see the blue and white on the edge...)

The blue and white fabric, the blue plastic thingy, and the white string
are remnants of the original ironing board cover.  Buh-bye!
 Instead, I got brave and decided to begin fresh this time.  It really isn't a big deal...I did both ironing boards in one evening.  I thought I'd share with you just how easy it is to recover your ironing board.

See the chalk outline?  It is just that simple to get the right size.
First, flip your ironing board on its back and trace the shape of the board onto your new fabric.  Add approximately three inches all around to all for the new casing and the wrap around the board.

See?  I just traced with fabric chalk and cut it out.  Truly, I just eye-balled the
entire thing.


Cut out your fabric.

I didn't even double over the casing...just a down and dirty hem. 
It is going to be on the underside and the inside of your ironing board.
Just remember to leave an opening to thread your elastic through.
 Fold over one inch and iron for the casing.

See the elastic?  I tied it in a knot and trimmed it close AFTER I took this picture.

Sew the casing, leaving an opening to thread elastic through the entire thing.  Making sure you keep both ends of the elastic from slipping into the casing, try your ironing board cover on for size.  Fiddle with it until you get it just right and tie it off when you have it taut.  That's it...you're done!


There you have it.  A new ironing board cover...pretty simple, right?  I've used them both since I recovered them and they do make me smile.  Mission accomplished!


Monday, October 3, 2011

Easy Peasy Halloween Craft - Jack-O-Lanterns

The world shifted on its axis recently and my family has been the beneficiary of the effects!   Seriously.  Here it is October 3 and my Halloween decorations are up and I've even had time to do some Halloween crafts.

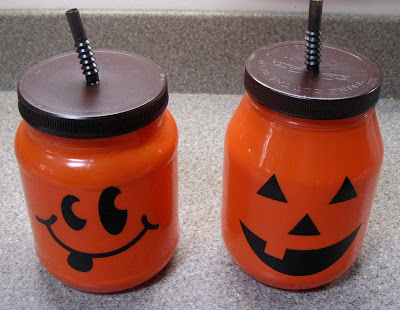
This little one was so quick and easy (and had my neighbors scratching their heads).  It was so easy, I just had to share it with you. 


You'll need: 
bigger empty plastic jar with lid (clean and no label)
orange paint (spray paint or craft paint)
brown or green paint
a straw
something to make the face:  vinyl, sharpies, paint

I had some empty plastic jars (mayonnaise and beef jerky treats) that I washed and removed the labels.  Took them outside and spray painted the inside of the jars orange.  (Seriously, I wish you could have seen my neighbors' faces when they saw me out on the front lawn painting plastic jars orange and surrounded by a bunch of little kids who were watching with tremendous intensity.  It was so funny.)

Anyway, where was I?  Oh, yeah...  Painted the jars orange (we had orange spray paint...very weird)


and painted the lids brown.  Gave it a little more thought and came up with those "kid's cup" straws from restaurant kid's meals and painted them brown, too.  (The neighborhood kids were equally split between brown and green...I had brown on hand, so brown it was!)

Let everything dry and headed downstairs to get some pumpkin face vinyls via my Silhouette machine.  (Have I mentioned how much I love that machine?  It is so awesome...seriously awesome!)


 Once the paint was dry, we applied the faces.  Isn't my assistant cute? 


 Drilled holes in the lids and inserted the bendy straws and added some hot glue to keep them stable.  (Careful drilling the holes...one of the lids cracked when I drilled the hole.)


  Added our battery operated candle and we're ready for nighttime!


The kids can stick these in their windows and I don't have to worry about anything more than dead batteries.  Love it!

Friday, September 30, 2011

Primal Bruschetta

My family loves bruschetta.  No, really, they love it.  This is the recipe I've used for years.  Unfortunately, putting it over pasta is no longer an option for a grain-free family.  That didn't stop us, however.  Bruschetta is already primal!  As long as you're sourcing good vegetables, you are good to go.

I just used bigger chunks of zucchini and bigger pieces of meat thank I used for my Capellini Pomodoro and our Bruschetta became a meal!  I didn't change my basic recipe...I even had tomatoes and zucchini from our own garden to make it that much better--I don't think you can get any more local than that...SRSLY.

As you can see, it became more of a stew than anything else.  It was amazing.


I even went hog-wild and topped mine with parmesan cheese. 


Erin's Bruschetta
Inspired by the Capellini Pomodoro @ Hotel Figueroa

Directions:
8 tomatoes - chopped
2 small zucchinin -chopped
1 small onion - diced
2 tsp. ground basil
1 clove of garlic - minced
2 tsp. balsamic vinegar
1/2 tsp olive oil
1/4 tsp salt
1 tsp ground pepper
2 T. grated Parmesan cheese
I won't lie to you.  Going primal has taken some adjusting.  Pasta-based meals were a mainstay in our family.  We are constantly redefining meals...tweaking here and there.  Still, the pay-off has been well-worth the hassle.

Wednesday, September 28, 2011

Quick Sewing Post

Finally got some new bedding...ours was old and tired.  I really love my new duvet cover and shams, but...


...the fabric was so slick that the pocket closures on the back of the shams weren't staying shut and the pillows kept sliding out.  It doesn't help that Beans is always sitting on them in her "Queen of the World" pose (with her monkey...story for a different post).

So, I uncovered my sewing machine and got to work. Some sew on velcro and ten minutes later, my pillow shams are staying shut and I'm even more thrilled with my new bedding.  Something so simple and easy can make such a difference.  This will work on any pillow with pocket closures.

Just lay out the pillow sham right sides out.  Figure out where the closure should meet if straight (ie., not pulling). Pin one piece of velcro.


Then pin the other on the opposite side of the closure. Double check they line up properly.


Sew each strip on.  Remove your pins and close it up.  That's it.  You're done. 


Now your pillows will stay closed and there is just a little box of stitching to show for it.  A little less frustration in your day...easy peasy.


Woot!  The "queen" seems pleased, too.


Monday, January 19, 2009

A Quick (I swear!) Sewing Project.


Buttercup and I like nightgowns.

Buttercup and I get cold in the winter in nightgowns. (Okay, more me than her, but still...she's cold more than the boys!) Our first three winters here in Eastern Washington, we glammed it up by throwing an over-sized sweatshirt over our nightgowns...it was a "look", let me tell you. This year, I got creative with...wait for it...an old, cute flat sheet and sweatshirts! Yes, I made us nightgowns that keep us warm and (for me are actually long enough) out of a sheet and two sweatshirts. (Look, if you're not tall, you have no idea how much tall girls dream of nightgowns that don't hit us mid-shin...or at the bottom of our knees! Trust me on this, this is a big deal!) This project cost me roughly $12 for two nightgowns! (Sweatshirts were $5 each, the trim was roughly $2 and I had the sheet!)

Here is what you do...

Cut your sweatshirts off below the arm holes, but don't forget sweatshirts (especially the inexpensive ones) shrink up a lot and allow for that. We were going for an empire waist, so we measured about three inches below the armpit.

Then measure the circumference of the sweatshirt bottom and double it--that is how wide you need to make the skirt fabric. Then measure from below your chest to the floor and the is how long you need your skirt fabric to me.

Sew two basting lines - low tension, big stitches - (careful to not cross) across the width of your skirt fabric, one half inch below the top of the fabric...using the basting stitches you work the fabric to be gathered enough that it is now the circumference of the sweatshirt. After you've gathered the materials so that you have a width equal to the circumference of the sweatshirt, sew the skirt into a tube from top to bottom.

Now, you can just attach the sweatshirt to the skirt, or you can get all trick like I did and add contrasting piping first. After that, you just hem it and you're done.

Still not haute couture, but we're warm!

What do you think?